Monday, February 8, 2010

Determining your Computer RAM Type

Type

  • FPM – Fast Page - If you have a 486, you probably have FPM

  • EDO – Extended Data Out - If you have an early Pentium system, you probably have EDO

  • SDRAM - If you have a Pentium or Celeron system purchased in 1999, you probably have SDRAM

Sockets

Memory modules plug into a socket on the motherboard. There are three socket types.

  • SIMM30 pin – 3 inches in length

  • SIMM – 72 pin – 4 inches in length

  • DIMM168 pin – 5 inches in length

Most older 486 machines will use 30 pin modules. Later model 486 and Pentium machines will probably use 72 pin modules. More recent Pentium machines may have 168 pin.

Amount

Memory sizes increase by the power of 2. This results in sizes of 1, 2, 4, 8, 16, 32, 64, 128, 256 MBs.

  • On some older 486 machines, one memory module can be added at a time.

  • On most Pentium machines, modules must be added in pairs.

  • Each pair must be of the same size.

  • SDRAM modules can be added one at a time.

For example, if you have 8 MBs of memory on a Pentium, you have two 4 MB modules. To increase to 16 MBs, you need to add two more 4 MB modules. To increase to 24 MBs, you need to add two 8 MB modules.

Looking Inside

Now that you know the parameters, how do you determine which type you need? Looking inside the computer will not provide all of the information. It will confirm how many modules you currently have. You can also confirm the type and quantity of open sockets. If you only have four sockets and each socket contains a module, you will have to replace some of the existing memory modules.

Check the Manual

The other place to find the correct information is your owner’s manual. The manufacturer should have listed the type of memory required. You will need to determine the parity and speed.

Identification

Now that you have the necessary information, you find an ad for memory and still you may not be able to determine which modules you need. Why? Because the computer industry thrives on confusion and abbreviations. Here’s how to interpret the coding scheme.

30 pin modules

For 30 pin modules you will see something like

  • 1 x 9-60

  • 4 x 9-70

  • 4 x 8-70

The first number is the size in MB’s. In our example this would be 1MB or 4MB.

The second number represents parity. The value 9 represents parity and 8 represents non-parity. (Of course that makes a lot of sense!) The 9 or 8 also identifies that it is a 30 pin module.

The third value represents the speed.

72 pin modules

For 72 pin modules you will see something like

  • 1 x 32-60

  • 2 x 32-70

  • 4 x 36-60

  • 8 x 36-70

Just like the 30 pin modules, the first value represents the size, EXCEPT it only represents ¼ of the total memory size. Don’t ask why, just accept it. So the value of 4 represents a 16 MB (4 x 4) module. A value of 8 represents a 32 MB (4 x 8) module.

The second value, again just like the 30 pin, represents parity and the number of pins. 36 is used for parity and 32 for non-parity. You aren’t asking why again, are you?

The third value represents the speed, the same as the 30 pin

RAM Memory Technology

In order to enable computers to work faster, there are several types of memory available today. Within a single computer there is no longer just one type of memory. Because the types of memory relate to speed, it is important to understand the differences when comparing the components of a computer.

SIMM (Single In-line Memory Modules)
SIMMs are used to store a single row of DRAM, EDO or BEDO chips where the module is soldered onto a PCB. One SIMM can contain several chips. When you add more memory to a computer, most likely you are adding a SIMM.

The first SIMMs transferred 8 bits of data at a time & contained 30 pins. When CPU's began to read 32-bit chunks, a wider SIMM was developed & contained 72 pins.

72 pin SIMMS are 3/4" longer than 30 pin SIMMs & have a notch in the lower middle of the PCB. 72 pin SIMMs install at a slight angle.

DIMM (Dual In-line Memory Modules)
DIMMs allow the ability to have two rows of DRAM, EDO or BEDO chips. They are able to contain twice as much memory on the same size circuit board. DIMMs contain 168 pins & transfer data in 64 bit chunks.

DIMMs install straight up & down & have two notches on the bottom of the PCB.

SODIMM (Small Outline DIMM)
SO DIMMs are commonly used in notebooks & are smaller than normal DIMMs. There are two types of SO DIMMs. Either 72 pins and a transfer rate of 32 bits or 144 pins with a transfer rate of 64 bits.

RDRAM - RIMM
Rambus, Inc, in conjunction with Intel has created new technology, Direct RDRAM, to increase the access speed for memory. RIMMs appeared on motherboards sometime during 1999. The in-line memory modules are called RIMMs. They have 184 pins & provide 1.6 GB per second of peak bandwidth in 16 bit chunks. As chip speed gets faster, so does the access to memory & the amount of heat produced. An aluminum sheath, called a heat spreader, covers the module to protect the chips from overheating.

SO RIMM
Similar in appearance to a SODIMM & uses Rambus technology.

Technology

DRAM (Dynamic Random Access Memory)
One of the most common types of computer memory (RAM). It can only hold data for a short period of time & must be refreshed periodically. DRAMs are measured by storage capability & access time.

Storage is rated in megabytes (8 MB, 16 MB, etc).

Access time is rated in nanoseconds (60ns, 70ns, 80ns, etc) and represents the amount of time to save or return information. With a 60ns DRAM, it would require 60 billionths of a second to save or return information. The lower the nanospeed, the faster the memory operates.

DRAM chips require two CPU wait states for each execution.

Can only execute either a read or write operation at one time.

FPM (Fast Page Mode)
At one time, this was the most common & was often just referred to as DRAM. It offered faster access to data located within the same row.

EDO (Extended Data Out)
Newer than DRAM (1995) and requires only one CPU wait state. You can gain a 10 to 15% improvement in performance with EDO memory.

BEDO (Burst Extended Data Out)
A step up from the EDO chips. It requires zero wait states & provides at least another 13 percent increase in performance.

SDRAM (Static RAM)SDRAM, DDR, RAMBUS
Introduced in late 1996, retains memory & doesn't require refreshing. It synchronizes itself with the timing of the CPU. It also takes advantage of interleaving & burst mode functions. SDRAM is faster & more expensive than DRAM. It comes in speeds of 66, 100, 133, 200, and 266MHz.

DDR SDRAM (Double Data Rate Synchronous DRAM)
Allows transactions on both the rising & falling edges of the clock cycle. It has a bus clock speed of 100MHz & will yield an effective data transfer rate of 200MHz.

Direct Rambus
Extraordinarily fast. By using doubled clocked provides a transfer rate up to 1.6GBs yielding a 800MHz speed over a narrow 16 bit bus.

Cache RAM
This is where SRAM is used for storing information required by the CPU. It is in kilobyte sizes of 128KB, 256KB, etc.

Other Memory Types
VRAM (Video RAM)
VRAM is a video version of FPM & is most often used in video accelerator cards. Because it has two ports, It provides the extra benefit over DRAM of being able to execute simultaneous read/write operations at the same time. One channel is used to refresh the screen & the other manages image changes. VRAM tends to be more expensive.

Flash Memory
This is a solid-state, nonvolatile, rewritable memory that functions like RAM & a hard disk combined. If power is lost, all data remains in memory. Because of its high speed, durability, and low voltage requirements, it is ideal for digital cameras, cell phones, printers, handheld computers, pagers & audio recorders.

Shadow RAM
When your computer starts up (boots), minimal instructions for performing the startup procedures and video controls are stored in ROM (Read Only Memory) in what is commonly called BIOS. ROM executes slowly. Shadow RAM allows for the capability of moving selected parts of the BIOS code from ROM to the faster RAM memory.

How computer RAM works?

Similar to a microprocessor, a memory chip is an integrated circuit (IC) made of millions of transistors & capacitors. In the most common form of computer memory, dynamic random access memory (DRAM), a transistor & a capacitor are paired to create a memory cell, which represents a single bit of data. The capacitor holds the bit of information -- a 0 or a 1. The transistor acts as a switch that lets the control circuitry on the memory chip read the capacitor or change its state.

RAM stands for Random Access Memory. This means Information can be retrieve & store by the computer at any order. RAM gives your computer a temporary place to process electronic data. This means that, RAM chips continue to store information only as long as computer has electrical power. In other words, when you shut off your computer, all the data stored in RAM are lost.
All actual computing starts with the the CPU (Central Processing Unit).

The chipset supports the CPU & contains several controllers that control how information travels between the CPU & other components in the PC.

The memory controller is part of the chipset & establishes the information flow between memory and the CPU.

A bus is a data path that consists of parallel wires & connects the CPU, memory & other devices. The bus architecture determines how much & how fast data can move around the motherboard.

The memory bus goes from the memory controller to the computer's memory sockets. Newer systems have a frontside bus (FSB) from the CPU to main memory & a backside bus (BSB) from the memory controller to L2 cache.

For the PC to get information...

The CPU sends a request to the memory controller to memory & gets a report back of when the information will be available. This cycle can vary in length according to memory speed as well as other factors, such as bus speed.

Residing on the motherboard, the system clock sends a signal to all components, just like a metronome ticking. Each click of the clock represents a clock cycle. A clock running at 100Mhz represents 100 million clock cycles per second. Every action is timed by the clock where different actions require a different number of clock cycles.

Many people assume that the speed of the processor is the speed of the computer. Most of the time, the system bus & other components run at different speeds. Because all information processed by the CPU is written or read from memory, the performance of a system is dramatically affected by how fast information can travel between the CPU & memory. Therefore, faster memory technology contributes greatly to the overall system performance.

Cache memory is a relatively small amount (normally less than 1 MB) of high speed memory & resides very close to the CPU. It is designed to supply the CPU with the most frequently requested data. It takes a fraction of the time, compared to normal memory, to access cache memory.

The concept is that 20% of the time, what is needed is in cache. The cache memory tracks instructions, putting the most frequent used instruction at the top of the list. Once the cache is full, the lowest need is dropped.

Today, most cache memory is incorporated in the CPU. It can also be located just outside of the CPU. Cache that is closest to the CPU is labeled Level 1, the next closest Lever 2, etc.

Interleaving is a process in which the CPU alternates between two or more memory banks. Every time the CPU addresses a memory bank, the bank needs about one clock cycle to reset. The CPU can save processing time by addressing a second bank while the first bank is resetting.

How To Repair RAM

You can use the RAMCHECK memory tester for a variety of purposes. One of the most popular is to repair RAM. Repairing defective computer memory is a growing business, especially in developing countries where it is often more cost-effective to repair an old stick of memory than purchase a new one.

Of course, the first thing you need to do is test the suspect module to confirm that it is faulty. This takes just a few seconds with RAMCHECK.

If the module is OK, RAMCHECK will quickly identify the module's speed, size & type, and give a pass/fail message. If RAMCHECK has confirmed that the module is faulty, you will need to retrieve the data sheet from the manufacturer. This is easier than you may think, even for old modules.

First, find the manufacturer & the part number of the module. A small white label should be affixed to the module which includes the part number, and the manufacture
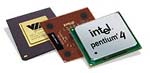
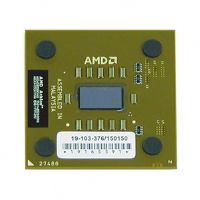
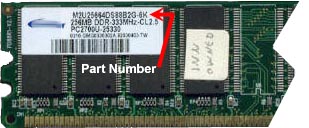
r's name should be printed on the PCB (see figure A ). Next, go to the manufacturer's web site. (If you don't know what the URL is, type the company name into the search box at google or yahoo. Most manufacturers allow you to search by part number. If not, by selecting the right product categories you should be able to quickly navigate your way to the correct data sheet, which is typically a PDF file. Still not having luck finding it? Search for the part number on google or yahoo. The data sheets may no longer be linked from the company's web site, but the search engines may still have the link in their archives. If all else fails, you can use a continuity meter from the pin identified by RAMCHECK to find the connected chip.

Once you have the datasheet, check RAMCHECK's display screen (see left). It will identify the relevant pins (circuit connections to the test socket) of the module which are associated with the problem. You can remove the module from the socket & review the Test Log. Easier still, use the RAMCHECK PC interface to identify faults (see below). Using this pin number & the module's layout from the data sheet, you can then trace the defect back to the faulty chip.


Now that you know where the defective chip is you'll have to replace it. Only a technician with component-level repair expertise can repair a memory module. The required soldering/ desoldering equipment is relatively complex, especially with modules & cards made with extremely thin Surface Mount technology (i.e., devices with TSOP chips). You will need a good deal of practice with desoldering techniques. Nevertheless, a few minor problems, which are identified by RAMCHECK, can be repaired with simple tools. A short between an adjacent pin may be caused by a small piece of metallic debris, which is stuck between two chips. You "repair" the module in this case with an Exacto knife or a watchmaker's fine screwdriver by simply removing the debris. If you use RAMCHECK in the production shop, you should be able to easily replace the module's components.

Repairing memory does involve a fair amount of work, but as companies around the world have discovered with RAMCHECK, it can be a lucrative business.

The Processor

and what is the processor? Well in the simplest of terms, it’s your computers brain. The processor tells your computer what to do & when to do it, it decides which tasks are more important and prioritizes them to your computers needs.

There is & has been many processors on the market, running at many different speeds. The speed is measured in Megahertz or MHz. A single MHz is a calculation of 1 million cycles per second (or computer instructions), so if you have a processor running at 2000 MHz, then your computer is running at 2000,000,000 cycles per second, which in more basic terms is the amount of instructions your computer can carry out. Another important abbreviation is Gigahertz or GHz. A single GHz or 1 GHz is the same as 1000 MHz . Sounds a bit confusing, so here is a simple conversion :

1000 MHz (Megahertz) = 1GHz (Gigahertz) = 1000,000,000 Cycles per second (or computer instructions).

Now you can see why they abbreviate it, could you imagine going to a PC store & asking for a one thousand million cycle PC please. A bit of a mouth full isn’t it?

So when buying a new computer always look for fastest you can afford. The fastest on the market at the time of writing this article is 3.8 GHz (3800 MHz). Remember though that it is not necessary to purchase such a fast processor, balance your needs, do you really need top of the range? Especially when the difference say between a 3.5 GHz (3500 MHz) & a 3.8 GHz (3800 MHz) processor will be barely noticed (if noticed at all) by you, while the price difference is around £100. With the money you save you could get a nice printer & scanner package.

Now that we have covered the speeds, there is one more important subject to cover. Which processor? There are 3 competitors at present, the AMD Athlon, Intel Pentium & the Intel Celeron. They come in many guises, but basically the more cores they have and the higher the speed means better & faster.

Processors now come as dual core, triple core and quad core. These processors are the equivalent of running two cpu's (Dual core), three CPU's ( Triple core) or four (Quad core).

In the past Intel Pentium the best & most expensive of them all, and remains today one of the most popular on the market. In layman’s terms it is/was the designer processor, although AMD have some superb if not better releases & equally highly priced and advanced products. It would be hard to say which is best as they are direct competitors.

Lastly there is the Intel Celeron; this processor is a budget version of the Intel Pentium 4, the processor you find in most budget computers. If the purse is tight, and you need a computer, then this is your port of call. You will find many sub £400 computers fitted with this processor.

Sunday, February 7, 2010

Installation of Japanese fonts on S60 2nd edition phone

If you have a bit older Handphone, using S60 2nd edition, such as Nokia N70, you have to download FExplorer 2nd edition , for Y-Browser supports no more phones of the 2nd edition.


and than you may then discover that the fonts are located at z:/system/fonts instead of z:/resource/fonts, so you have to install Japanese fonts at /system/fonts of your card memory


Do not forget to install also a Japanese gdr font by renaming to ceurope.gdr

Friday, February 5, 2010

Components of HDD

The components of the hard disk are very simple to understand by every one. The whole process begins with a steel case that on a side has the operating board that it contains coils, processors & many circuits, and on the other side it is written the capacity the speed and the way to use the hard disk. Inside the metal case we can find some disk and two or more mechanicals arm. The disks inside are very similar to a CD but it can be written on the both sides. The disks are rotating with the help of a small motor that can reach certain speeds. On those disks the information is written with the help of the mechanical arms that on the end of it are also connected to an engine & on the other end we can found some writing heads that perform actions on the disks.
The hard disk is the main non-volatile memory component of any system that brings together a personal computer. Compound by electronically & mechanical elements the hard drive is the component that can stock all of the data from your computer in non-volatile way but in the same time the data are stocked in normal & safe conditions. The main properties of the hard disk are the access speed for the transmission of the data & the hard capacity. Just like in the RAM memory if the hard disk has a bigger capacity and it is faster the better for your computer.
If you want to choose a hard disk that runs better on your computer you must first know what programs will run more often on your computer & you may consider the next example a better way to make the difference when you by a new hard disk: if you like to work with video recordings you will need a hard disk that is bigger in the stocking module or if you want to create a server files on your computer you will need a hard disk that runs in great speeds usually like the aspect of a RAID system.
Another main characteristic of a hard drive is the dimension of the memory tampon (buffer). This property is always forgotten but it will need some general attention from you because it helps the hard disk to temporary record some data on your hard disk. The bigger the buffer is you will notice that the computer is faster because the data that you are trying to access can be found in that zone so the performances are greatly increase. One thing you must know before we can continue, the hard disk are the weaker components in the computer even today when it cams to searching/riding/writing that takes place on the hard disk.
For better understandings of the hard drive we will take all of the main properties of the hard drive & give some information about them:
- the mainframe of connection – this option depends on your type of motherboard. The hard drives can have two different interfaces like P-ATA or S-ATA. The difference between them is the speed of the data on transmission from the motherboard to the hard disk. Of course the S-ATA has a greater speed for the transmission of the data but this option is available only your motherboard can sustain it.
- the capacity – this is an option that you must decide first what are you going to use your PC first.
- the buffer – the buffer is usually measured in MB & it indicates the dimension of a tampon memory in witch we can find some data that where recently access. The bigger the buffer the better for your computer but this option usually makes the hard disk more expensive.
- the speed – the speed of the hard drive is measured in RPM (rotation per minute)

How do I know if I have bad sectors

Let’s speak about how we can find out if we have some bad sectors on our hard disk. A simple read error that appears like this “Error reading from source” should be a problem that you really need to give a special attention.
This type or error can appear when you try to run a application, a video game, a movie, etc. & it means that the information that is on your hard disk is no longer accessible for the computer, this can be a part of the application & still we will get the same error. Bad sectors maybe already on our computer but now we need to find out if that problem is software or hardware. An error in the FAT system can create the reading error & the problem is not so big if we just re-write it. The serious problem appears only when you reinstall the operation system & still get the same error over & over again. In this case we must reboot & in the DOS mode we must run the application called Scandisk (Scandisk from Windows can trick us in this case and it might show us some false values) and this will check every cluster & sector on the hard disk and will indicate witch are the bad sectors, how big they are and in what partition of our hard disk exists.
Another way that we can concern if we have bad blocks is if we get for no reason the all ready know blue screen (remember also when we try to run an application). Many of us don’t even think of the blue screen error that it could be from the bad sectors & only after a full scan of the computer, finds out.
The free space that is indicated by the operation system can be another way to tell if we have or don’t have bad sectors. Let’s say that we have a partition of 10 gigabits & it is absolutely empty and the amount of free space, when we ask for this option, is shown that the partition has only 8.5 gigabits. In this case you must run a bad sector program over that partition to see if everything is ok. Do not get trick because of the safety space that every hard disk have. The safety hard disk is the measure of the hard disk for writing down the files. Surely every one of you knows the safety space but just didn’t know that this is its name. The safety space is the space that is not indicated by any operation program, for example: you buy a 100 gigabits hard disk & when you install it the operation system will show only 99.2 gigabits. Why? Well let’s just say that is more of technical information & is harder to explain.
When you install the operation system on your computer or any other application on the computer you might get the error report that looks just like this “cant copy to source” can also indicates the apparition of some bad blocks. Know we must see if the bad sectors are in the FAT sequence or a partition.
So if you don’t have any kind of the errors that we speak about it doesn’t mean that you don’t have bad sectors on your hard disk. For your safety & lack of concern it is better that once in a while to run a Scandisk or another application that identifies the bad sectors. Conclusion: we can never say that we don’t have bad sectors until we check with a license application specially designed to find those problems.

Why bad sectors appear

Why the bad sectors appear? That is a very debate problem as the engineers are struggling to explain it. But some general ideas of why the bad blocks appear to the hard disk have every person that has this problem. The reasons that they appear are explained in long forums discussions & also explained in the specialty magazines.

Let’s begin by telling you some generals reasons for which bad sectors appears:
- the reading heads are sustaining them self over the platens for that little distance whit the help of the air flow that creates from the high rotation of the platens; when the platens are stopped the air flow disappears & the reading head are gently touch the surface of the platens whit no risk for the hard drive. However, if the reading heads are touching themselves on a high speed that will create a disaster for the hard drive & also the bad sectors appear.

- another factor that can create bad sectors on your hard drive is the mechanical shocks. Hit the hard drive or accidentally drop it from your hand increase the apparition of the bad sectors. Also if the mechanical shock must not be applied directly to the hard drive & still creates bad sectors, for an example lets say that your entire tower case drops from the support. In the mechanical sector we must include the vibration. If you have the tower case of your computer opened & the hard drive is running, if you move it from its place or lean it from one side to another can also increase the chances of the creation of the bad sectors. The hard drive can sustain vibration by only a couple of grams & if you drop your hard disk on the floor consider yourself lucky if you don’t get some multiple bad sectors.

- heat can create bad sectors; inside your hard disk the platens are moving with speeds between 4400 rpm to 15000 rpm. Because of this speeds the hard disk is producing a very important quantity of heat and doesn't eliminate very much of it throw a standard cooling system on the computers. Is you notice that the hard drive is very hot when working you can consider installing an additional cooling fan especially for the hard disk. So the high temperatures can make some components of the hard disk not to work properly & so it leads to the apparition of bad sectors.

- the mechanical and electronic parts of the hard disk can create bad sectors if they malfunction. Most of you already know that the hard disk has a board full whit electronic piece. If some of those transistors or coils are not working in normal parameters & dos not transmits the right information or the right induction currents that where meant to be it can lead to a malfunction of the reading heads and so to the creation of the bad sectors.

- the demagnetization of the hard disk platens can also create bad sectors. The demagnetization can appear because of the cheap quality offered from the manufacturers or because of the head slap. If the hard drive is accidentally hit some particles on the reading heads can detach from them & creating a small and fine dust that will remain on the platens and when the reading heads are returning to that sector to perform a different action it will be stopped by that dust. You can already understand that the spot where the dust is already is transformed to bad sectors.

- one factor that was creating more hard disk bad sector then no other (that of course if we look in past, for the actually hard disk that are on the market is no longer available) is the power clinch. The newer hard disk has safety pieces to prevent damage from the clinch but is not always working for all of the hard disks.

Old Hdd vs New Hdd

From 5 megabytes to 1 terabit. That’s the story of the progression of the hard disks that was reach in only 20 years. The hard disks are always remarketed when some problems appears at them. Older hard disks, newer hard disk there was always a common problem that it is not solve even today with al of the technology & that problem is bad sectors.
The older hard disk where more exposed to the apparition of bad sectors because of many factors, & that factors where eliminated on the way of progress. In the factors area the common problem was the big size of the hard disks. A bigger case that protects the hard disk means more protection from eliminating the heat that is generated from the moving parts. This heat can only create bad sectors. Actually the case of the hard drive was actually so big & they reach a weight of even 3-4 kilograms. The new hard disks are protected from the heat problem because they have safety measures for this problem & the risk of apparition of bad sectors because of the heat was minimize but not eliminated.
The new hard disks have safety measures when the computer is being shutting down. That only ensure a better ergonomic function of it, and the risk of apparition of bad sector when the computer stops is also at a minimum level; the older hard disk didn't have the protection system for the off line mode & when the computer stops the hard disk also stops because of the lack of power. Shorter said when we cut down the power the reading heads are dropped exactly where they ware & so the apparition of bad sectors increases.
But an advantage did appear at the oldest hard disks & that is the speed of platens (rpm); even if they have a very reduce capacity 600 megabits to 3 gigabits the rotation per minute was smaller & that decreases the chance that two of the reading heads to hit each other (then the speed was at a maximum 3400 rpm) so decreasing the bad sectors apparition. In our days the high performance hard disk of 1 terabits are reaching speeds of 10400 rpm, a tremendous speed but with that speed also cams the risk of the bad blocks.
If we can speak of another difference between the old hard disks bad block & the bad blocks of the new ones that surely must be the functions that each other is completing. A older disk model has very few functions but that is not the aspect that we are interested of but the fact that the less function it has the smaller chances that those parts to malfunction. In the new generation the hard disks have all kinds of option & function but if one of them stops working can easily lead to the creation of the bad sectors. To understand better the chances to broke one function from ten are smaller then to break one function from 50.
Of course if we generalize the discussion the risk that the new hard disk to create bad sector is significantly smaller; otherwise the older hard disks where more predicted to create bad sectors. But bad sectors remained bad sector even in the apparition of the hard disk & even today we can minimize the risk of their apparition not entirely eliminate. In the end we can say that in the past the bad sectors where created easier then in our time but still bad sectors remains.

How to fix bad sectors

Let’s try to explain the question that grinds us all when in cams about the hard disk. Can we actually repair a bad block? Before of the answer you must find some information about what is a hard disk, how does it work, what are bad blocks. After that you must identify them because you will need the exact location of the affected sectors. After you have done that you must run a few steps:

- before you try to resolve the problem with the bad sector you must extract the data that was written to that block. To do this you must run a Recovery program that you can find freeware on the net.
- bad sectors are unreadable parts on your hard disk but the nature of them must not be always physically & that part of the platens to be destroyed. The bad sectors can be simulated by some programs. This means that some programs installed on your computer can interrupt the reading process on to another segment of the platens. That is in the most happier cases but the chances that the bad sectors are cause by this is less then 10 percent. In this case is difficult to resolve the problem because even the Scandisk or other identification programs used to discover bad blocks will give a rapport that nothing is wrong with your hard disk. The best way is to uninstall the latest programs applied to the computer.
- lets supposed that you have a 20 gigabits partition on your hard disk that has bad blocks. After the identification program it will indicate you where are the blocks situated on the partition. So this way you can isolate them in to another partition that you must never use again. Another scenario can be created & the bad sectors can be at the beginning of the partition in the middle of it & at the end of the partition. Know it’s a little bit tricky because you can’t just go on & create three new partitions to eliminate the bad sectors from use. In this case most of the new hard disk has a spare space available just for this type of scenarios. You must access the CASH memory of the hard disk & indicates to the hard disk that instead of writing down on the effected blocks it must write to the spare blocks.
- another to restore the hard disk is to use the low level format option. Many of you think that low level format is a program. Wrong, the low level format option is set for any BIOS & can be easily use if you know some command line programming. The low level format can take to be complete a very long period of time but in the most cases we can obtain marvelous results. Actually the low level option takes every cluster of the hard disk & identifies them again (throw a thermal process) & writes down on the memory of the hard disk what sectors can be written & witch blocks are un-writable. This procedure is the best that can be because it will need no effort from your side to try & avoid the bad blocks that already exists & the hard disk itself know where the bad blocks are.
In conclusion the bad blocks can’t be fixed. The problem is a permanent one & we can only try to use the hard disk until it is broken down for good. But if you are having financial problem this is a best way to keep going with your old hard disk.

What is bad sectors

First of all we must understand what an error is & how errors can appears. The misapprehension between the data & between the boards & the compatibility of them can result in an error. All of the errors are supported by the hard disk & can be very destructive to it.

To make it easy for all of to understand what a bad sector is we will try to explain it away from the technical terms. Consider you have a piece of paper and the entire paper is the writable zone where your hard disk saves information. On this piece of paper we draw lines to divide it in small squares. One small square represents a sector of your hard disk, and if we divide one square in to 4 squares we can obtain, imaginary of course, 4 cluster. Ok know you want to write a sentence on the paper. You will notice that there no room to write the sentence in only one small square & you will need a certain amount of squares from different portions of the paper; know write down your sentence.

After that take scissor & cut a word from the sentence in the middle of it. You as a person can still read the sentence because we can realize what word is messing from the sentence but a computer to show you that sentence needs all of the words to reproduce it for you. The part that you cut from the sentence is our bad block, and now you can underst & how the hard disk functions. And all of you know that on the driver is more then a sentence written, and that it contains millions of letters & numbers & also holds information about all of the boards, along whit their drivers, that are in your personal computer.

Some surface errors have connections whit the hardware equipment of the computer directly & can create physically bad sectors on the hard drive, & that means a cluster from the hard disk sector is unreadable. The writing action on the hard disk is possible thanks to a “writing head” that floats at a distance of 0.3 microns over the writable layer of the disk. If one or more heads actually touch the writable disk the chance to destroy that cluster is almost 100%.

The bad sectors are in definition a portion of the hard disk writable part that cann't be change (read or write). So because of this definition the data that are on the bad sectors may be lost forever.
You can be easily be trick to think that your hard disk have bad sectors, most of the time are errors that appear because of the over churching of the partition or of the Windows directory.

Bad sectors also known as simple as “bad” can appear to any hard disk after a time of function. In most of the cases the bad sectors that appear aren't in a bigger quantity from your stocking space (about 0.01% for newer hard disk). For the new gene ration of hard disk there are some spare clusters just for these problems. When a bad sector appears the safety measure remove the information that it contains to a spear cluster & that way avoids the lost of data or the corruption of the data.

In a generally idea a bad sector is a big problem for your hard disk & for your entire computer. There are some programs that can repair them if there aren't physically & are from data corruption but that is another story about the hard disks.

Pro Evolution Soccer 2010 Hints and Tips

Pro Evolution Soccer 2010

Fans of the Pro Evolution Soccer series will find Pro Evolution Soccer 2010 instantly accessible through the new PS3 games download section. There is no huge overhaul and so there is not learning curve to overcome. This is a definite improvement over last year’s effort with a series of subtle but welcome tweaks.
In this article we are going to offer up some hints and tips to help you get the most from Pro Evolution Soccer 2010.
Editing Names
The argument over Pro Evolution Soccer 2010 versus FIFA Soccer 2010 will rage on & on but one point which continually comes back to bite PES is the fact it lacks all of the official licenses. This means that some teams, & even some players, have been given fake names. If this is a source of irritation for you then you could always access the Edit option from the main menu & update the names yourself. You can change player names, team names, cup names and even stadium names.
The edit feature in Pro Evolution Soccer 2010 is very powerful and you can also create new clubs, players and even new team chants. You can upload your own logos, images for player faces and even sound files to use as chants during the matches. You can also capture your images via the PlayStation Eye Camera if you like.
This may involve a fair bit of work on your part so you’ll be glad to know that you can just download an option file for PES 2010 with all of the correct info from a website. Konami will also be releasing an update soon that tweaks the teams to update the line ups in response to real transfers.
Attacking in PES 2010
The gameplay in Pro Evolution Soccer 2010 has been improved with 360 degrees of movement. You’ll find you can control your players more accurately and the potential for silky footballing moves is vastly increased. As always the main challenge when attacking is to get your player past the defenders & find that killer pass or space to shoot on goal. Let’s take a look at a few moves designed to help you do just that.
The simplest way to get past your man is to sprint using R1.
You can knock the ball further on by tapping R1.
You can keep the ball close & dribble slowly by holding R2 and R1.
You can also press R2 while sprinting to jump over an incoming challenge.
You can perform a Step Over by pressing L1 twice or R2 twice.
You can feint to kick by pressing X when the power gauge is up.
There are various other tricks you can pull off and the majority involve quick changes of direction. It is important to remember that tricks and manoeuvres in PES 2010 are limited by the skill level of the player you are controlling so don’t go attempting elaborate tricks with a big burly defender. You should also try and become familiar with them to the extent that they come out as a natural part of your play because using them in the wrong circumstances will lead to a loss of possession and often a dangerous counter attack.

Defending in PES 2010

Attacking in Pro Evolution Soccer 2010 is relatively easy & very intuitive. Defending is a bit more difficult. For a start you should try to remember to stay in the right position. Blocking is very effective in the game so it is often best to keep your body between the attacker and your goal & avoid actually committing yourself for the tackle. If you get the timing wrong on a challenge then you won’t recover in time to catch the attacker and you will also run the risk of giving away a free kick or penalty. Let’s take a look at some basic defensive moves.
It is good to pressure the ball and it often provokes mistakes in your opposition. The best way to do this is to hold down R1 and X when you don’t have possession.
If you want help closing down an opponent use Square to pull in the nearest man, just be careful you aren’t leaving a gap to be exploited.
You can Slide Tackle with the Circle button but the timing has to be perfect & you must attack the player in possession from the front or you’ll almost certainly be booked.
If an attacker does get past you or the opposition play a long ball into your box then use Triangle to bring your keeper running out. Obviously if you time this wrong your opponent will side step and finish with an easy tap in so be careful!
The most common cheap goal in the game happens when the goalie passes to a nearby defender and the attacker skips in or tackles to break through & score. For inexperienced players I recommend using Circle to kick out with your goalie.
If you win the ball in your own box just hoof it up the field with Square or Circle don’t try to be clever.
Team Set-Up and Tactics
There are two kinds of Pro Evolution Soccer players, some just pick a team and get straight into the action, others like to spend hours tweaking their team line-up, editing player positions and choosing tactics. The majority of teams will be set up automatically with the kind of tactics they tend to play and their top players will be in the first 11 but don’t assume that’s the case. You should definitely check the bench to see if a skilled playmaker or speedy striker is lurking there. You should also change the formation and tactics to suit you.
Another big improvement with Pro Evolution Soccer 2010 is the ratings system. It is now clear how good players are & there is an overall number rating to give you an idea about their strength as well as a detailed breakdown of their specific skills. When you click on a player name in your team line up you can see at a glance what positions they are best employed in. Try tweaking your formation or moving players around and you’ll see their overall rating number change according to how well they can play in the position selected. Remember you don’t just need to stick to the set formations. You can always just edit individual player positions and set the team up exactly how you want it.
You should also remember to set tactics because they make a big difference to how your team plays. You can be defensive or attacking to various degrees or you can choose something like a counter attacking style. There is also a new Card System in PES 2010 which allows you to fine tune the individual roles of each player in your line-up. Just remember it will be superseded by the team tactics you choose.

Thursday, February 4, 2010

Windows Vista


Windows Vista Security Microsoft was continuing focus on security will be evident in this new operating system. They are basing the foundation of Vista around security. Windows customers should be confident that this operating system will protect their computer and information against the latest worms, viruses and malware. However, in the unlikely event you should fall victim to a successful attack, Windows Vista will ensure the damage is minimal. Below, I have outlined a few of Vista's security features :User Account Protection:Vista's user account gives added protection and allows for users to be allowed to run applications under a standard account. But, in the event the standard account user is unknowingly trying to run a malicious code, Vista will intervene and don not allow the user to continue. Or, if a standard user account is trying to install a hotel printer driver, Vista will just simply ask you to confirm your intensions & provide credentials. Protection from malware : Malware can cause company IT departments & their users to waste significant amounts of times in dealing with the effects that it creates. Windows Vista includes powerful features that can stop malware before it can cause any problems. Not only will this be a huge time saver for any IT department, but it will also allow the operating system to run much smoother. Multi-tiered data protection : By using advanced data protection technologies, Windows Vista reduces the risk of your data on a stolen/missing laptop from being compromised. Windows Vista supports full-volume encryption to prevent other operating systems from accessing its data. Another optional disk access prevention feature is the TPM v1.2 chip (Trusted Platform Model) that can be installed on your computer to store encryption keys. By using the TPM, the entire system partition is encrypted (both the hibernation file and the user data).C ustom authentication mechanisms : The use of a user name & password for many companies is no longer a fail safe method of security. Windows Vista has improved upon Smart Card support making it easier for developers to add custom authentication methods such as biometrics and tokens.Network access protection:An internal network can be compromised by its mobile computers not having the necessary updates and security settings available due to the use of unsecured networks at hotels, cafes,..etc. Windows Vista will only allow a computer to connect to an internal network if certain security criteria are met. If the system has been compromised, it will not be allowed in. Firewall: System administrator have full control via Group Policy over what applications are allowed or blocked from communicating with the network. The control of network access is a key component of network security.Windows Service Hardening:If an unlikely virus attack were to exploit a vulnerable service, Windows Service Hardening would limit the damage by preventing file system or registry changes from occurring. Internet Explorer 7 enhancements:IE7 uses many new features to protect's against malicious Web sites, malware, phishing and spoofing attacks. The new Protected Mode would also allow a user to define their own security settings. Other new features of Internet Explorer 7 include: - Highlights the address bar when users visit a Secure Sockets Layer-protected site and lets them check the sites security certificate validity.- If visiting an unsafe site, a phishing filter would warn the user of this risk.- Clear all cached data with a single mouse click. Browse more securely and confidently with Internet Explorer 7!


The new Windows Operating System formerly code named "Longhorn" is now named Vista. This new operating system is due out in the middle of 2006. I' m going to be writing a great deal about it here at 5 Star Support so that you all can become familiar with it before it comes out. In this tip, I will discuss a little about what you can expect from Vista from a troubleshooting stand-point.Vista promises to have great troubleshooting features built in to aid users in quickly diagnosing computer issues. For instance, Windows Vista diagnostics can automatically detect & diagnose failing hard disks, faulty memory, degraded performance, loss of a network connection and problems shutting down. Having the ability to detect a failing Hard Disk before any loss of data occurs, makes this an extremely valuable feature. But, nothing takes the place of good backup practices.The Windows XP Remote Assistance feature is a huge time saver for all support centers. Vista promises to enhance this feature and make it better by having the ability to remotely connect faster and use less bandwidth. It will even have the ability to function through Network Address Translation (NAT) firewalls. The remote assistance will incorporate its own built-in diagnostic tools available with a single click. You will also be able to reconnect to a Remote Assistance session automatically after restarting your computer. One last enhancement worth a mention is that two administrators will now be able to connect at one time. This will be valuable on those hard to troubleshoot problems that could use a second set of eyes.

1. Right click an open area of the Taskbar
2. Select Properties
3. Select the Start Menu tab
4. Tick the Start menu entry and click the "Customize" button to the right.
5. Scroll down the list until you find the "Run command" entry.
6. Place a checkmark in the "Run command" checkbox.
7. Click OK.
The Run command should now appear in the Start Menu.
Note: A simple way to access the Run Command is to press the Windows key + R on your keyboard. If you don't know what the windows key is, it is the key that is between CTRL and ALT on either side of the space bar.

If you would like to remove the list of user accounts and have users login using a password & user name, change the following settings:
1. Go to Start
2. In the Search box, type: local security policy
3. Double click the local security policy entry
4. Open "Local Policies"
5. Select "Security Options"
6. Double click the entry titled: "Interactive Login: Do not display last user name"
7. Place a checkmark in the "Enabled" checkbox
8. Click OK
If you are not comfortable with the default settings that Vista uses, you can easily change these settings, here's how:
1. Go to Start>> Control Panel>> Folder Options icon.
2. Select the View tab.
3. Check or uncheck the options under "Advanced settings:" as you see fit.
4. Click OK when finished.
When you purchase a Windows Vista product, all of the different Vista (OS) Operating System products are on the same disc. The actual product key that is inserted will determine which Vista product will be activated. If you would like to upgrade to a more feature packed version at some point, all you would need to do is change the product key to activate your newly purchased version. Here's how to change's the product key:
1. Go to Start>> Control Panel>> System.
2. At the bottom of the System applet, you'll see a link titled: "Change product key". Click this link.
3. Click Next, then in the resulting window, enter your new product key ID information.
4. Click OK.

Many people reboot their system after each use. While there really isn not anything wrong with this practice, it may be unnecessary. Especially if you are having to reload several applications after each reboot. A big time saver may be to use Hibernate and/or Sleep modes. Once the system is placed in hibernate or sleep mode, you will not lose any of the applications that are currently open and the system will not need to go through the boot process.
When you have an outdated firewall or anti-virus software installed on your system, Windows Vista will pop up with these notifications. If you become annoyed with these constant notifications, you can change the way Vista notifies you. Here is how:
1. Go to Start>> Control Panel>> Windows Security Center.
2. Once in the Windows Security center, click the link on the left pane titled: "Change the way
3. Security Center alerts me".
4. Modify your preferences as you see fit.
5. Click OK when finished.


1. Open Windows Explorer
2. Select Tools--> Folder Options
3. Select Organize
4. Select Layout from the drop down menu
5. Deselect Navigation Pane.
6. Click OK.
This free utility is designed to help you customize the Vista user interface. TweakVI supports both 32bit and 64bit versions of Vista and works for any Vista edition. Unlike many other free utilities on the Internet, TweakVI doesn't load any advertising spyware nor does it have the ability to damage any of your hardware. Below is a list of some of the many things you can do with TweakVI:
Activate hundreds of Windows Vista settings
Manage TrueType fonts
Clean your hard drive
Improve your Internet connection
Optimize your CPU cache
Optimize your RAM
Manage system updates
Helps to protect your privacy
Tweak Internet Explorers Toolbar
Tweak the Start Menu
Change the animation on windows
Increase system speed
Clean your registry
Create a 256 MB RAM drive

How To setup a LAN

What is a Network?
A Network is simply the infrastructure that connects a number of electronic devices so that data can be transferred between them. By devices I could mean computers (PC's, Apple Mac's, PDA's) or printers, scanners, modems, CD room, etc.
In this page I will refer mainly to computers instead of devices. Oh and by the way, I'm primarily a PC man so when I say computer I'm usually thinking of a PC. Please ask in the forum if you have another system and are not sure about something.
What types of Networks are there?
Networks can take many different physical forms. The main categories of networks in order of distance are: (PAN) Personal Area Network Used to connect wireless devices carried by a person (e.g. PDA, mobile, etc.). The Bluetooth technology is currently the prime contender for this LAN Local Area Network Used to connect computers in a building wLAN Wireless Local Area Network Used to connect computers within a 100m (300ft) range without wires MAN Metropolitan Area Network Used to connect computers in a town/city WAN Wide Area Network Used to connect computers whatever their location
If you are more interested in this, try looking up network topologies and technical terms in webopidia and what is and current.
Do you need a LAN?
First of all - do you need a LAN? Well that depends on what you want to do...
A LAN will allow you to:
Allow all of your computer to share an Internet connection
Share data (e.g. Word documents, music, video and any other type of file) between computers
Share printers, scanners and other networkable devices
Stream music and video from one computer to another (as opposed to downloading and then running locally)
Play multi-player games
Backup data
Video-conference (e.g. from one room to another)
etc.

Cabling
Although you can buy cables at specific lengths (e.g. 2 metres, 5 metres, 10 metres, etc) , or even buy them to your specified measurements, it is often easier to make them yourself. This way you can make them to the required length.
Here I have explained how to make cables for
What you will need:
Length of the UTP (Unshielded Twisted Pair) cable (e.g. xx metres) UTP RJ45
RJ45 Plugs
RJ45 cable boots (1 for each RJ45 plug) not essential but preffered as they re-enforce the fitting of the cable into the RJ45 plug
RJ45 Crimp Tool
The RJ45 plugs should have the following wire order: (where pin 1 is on the left when you look at the RJ45 plug from behind and it is upside down - i.e. the latch that sticks out is pointing down and towards you)
To make the cables :
Cut the cable to length
Strip the ends cable (the crimp tool will probably have a wire stripping gizmo on it to strip the wires to the right length)
Put the RJ45 cable boots onto the cable (you do not actually need these, but they do serve three purposes:- They look good, they help prevent damage to the cable from bending just behind the RJ45 plug and if you use different coloured boots, they can help identify which cable in the hub the individual wires into the RJ45 plugs (in the order shown in the tables above)
Use the crimp tool to crimp the wires into the plug. double check that the wires are in the correct order, have been crimped properly, etc.


Tuesday, February 2, 2010

How To Convert Youtube Video To Mp4

This Guide aims to telling you how to free download YouTube video and convert it to MP4 for your iPod, iPhone, PSP or other MP4 players.With YouTube, you can visit it every day for fun, news, videos or whatever. Chances are that you sometimes want to download the YouTube videos as MP4 files for your multimedia devices, like iPod, iPhone or PSP, so that you can watch it on the move. How to free download YouTube video? There are two way to free download YouTube video:

a. with free online flv converter;

b. with firefoxThis guide is also fit for other video websites How to converter YouTube video to MP4 for your MP4 player? However, YouTube video is usually in FLV format, which is a preferred file format that is designed for web playback. To playback YouTube video on your iPod, iPhone, PSP or other devices, you can't download it as MP4 file directly, but need a video converter to help you convert it to MP4 instead.

c. Download, install and run , there are many video converters available for you. And most of them offer free download. You can easily get one from Internet or free download one here.

2. Upload YouTube video Click "Add" or "File"to import your YouTube video to this YouTube to MP4 video converter. There are four buttons including Remove, Clear, Move Up, and Move Down for you to manage your source files. And the following is its main interface.


3. Edit the downloaded YouTube video (Optional) If you want to edit your YouTube video, just click "Edit" button on the tool bar. There are many options for you. Preview the original and output video; Crop the frame size of YouTube video to get the part you want; Add special effects like Old Film, Gray, Emboss and Negative to YouTube video; Trim the video into multiple clips; Decorate YouTube video by adding picture or text watermark to it.

4. Set the output options as MP4 format Select the proper output format and destination folder for your YouTube video. Here we choose MP4 AVC (*.mp4). You can also choose the format in the category of iPod, iPhone or PSP. 
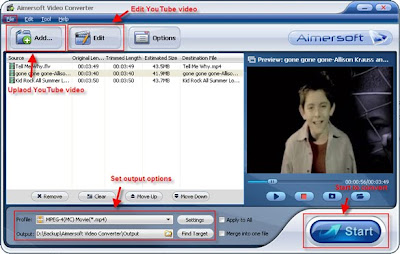
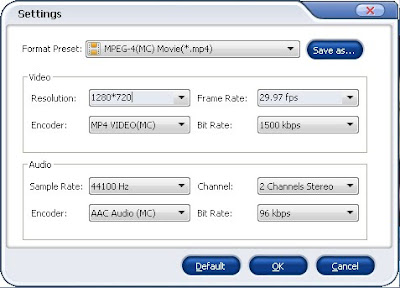
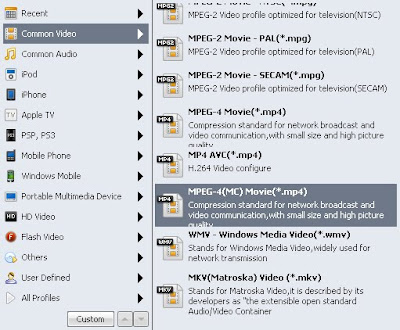
To satisfy your every need, it allows you to configure the resolution, frame rate, bit rate to maintain the high quality of YouTube video.


5. Start to convert After all necessary settings and editing, just click "Start" button, Helpful Tips:


1. Snapshot take a screenshot of your favorite picture from the YouTube video and save as JPEG or BMP format;

2. Merge into one file merge several clips into one file as you like;

3. Apply to all convert YouTube videos in batches to save your time.
GA_googleFillSlot("ArticleSnatch_ComputersTech_MidLeft_300x250");
GA_googleFillSlot("ArticleSnatch_ComputersTech_MidRight_300x250");
About the Author: This guide aims to telling you how to free download YouTube video and convert it to MP4 for your iPod, iPhone, PSP or other MP4 players.With YouTube, you can visit it every day for fun, news, videos or whatever. Chances are that you sometimes want to download the YouTube videos as MP4 files for your multimedia devices, like iPod, iPhone or PSP, so that you can watch it on the move.

How To Make Money With Google Adsense - Earning An Income Working From Home

Are you trying to find out how to make money with Google Adsense? Perhaps you are wondering exactly what it is or you've heard people talking about it and want to know how publishers are making an income with it. Maybe you're already an Adsense publisher & you just want to know what to do and how to do it the right way so you are making dollars instead of cents.Whichever of the above applies to you, in this article I'm going to explain what Google Adsense is & how you can earn money online with this program. What Is It?It's a program you can apply to and partner with Google to earn online revenue by displaying ads on your websites.
This is contextual advertising which basically means the ads displayed are relevant to the content and it's a pay per click model ( PPC ) which means you get paid whenever a visitor clicks on an ad that is displayed on your website. Google then sends you a monthly pay check for your publisher earnings. You can display ads on any site in your portfolio which complies with Terms of Service ( TOS )Making Money With Virtual Real EstateHere's a quick list of what you need to build up an online income with this program.
1) First you need a website with some quality content and a number of pages. It does not need to be a huge site but I don't recommend applying for an account if you only have a single page site. This also means you need hosting unless you are using a free blogging platform. Don't worry, this is relatively inexpensive ( under $10 a month starting out ).
2) Then you need to apply for a Google Adsense publisher account. Providing your site is offering good quality content and complies with their terms of service, you shouldn't have any problems getting your application accepted.
3) Google provided you with some ad code that you need to copy and paste into any pages you wish to display ads on. Your earnings and click through rate will be dependent on a number of factors including ad positioning.
4) You need traffic. If you don not get any visitors to your site, you won't earn any money so not only do you need a website, content and ads on your site, you also need eyeballs reading your pages. You also want high quality targeted visitors that are interested in your content and site topic.
5) I recommend you build your website around a specific theme so that the pages on your site are relevant to each other.There is a lot more to know if you want to learn how to make money with Google Adsense, but getting your account in place and the basics right lays a good foundation for all the other tweaks you can put in place quickly once you are up and running.

How to Upload Photos Directly from the Mobile Phone To a Facebook Account

It is becoming more and more popular and convenient to take photos via the cellphone. If you are a Facebook enthusiast and like to take photo via your cellphone, you could save the trouble to download the photos to your computer and to upload it again to your Facebook account. What you need to do is to activate your Facebook mobile and upload the photos from your mobile phone straight away.Just follow the few steps below:
a. Go to the picture in your cellphone which you wish to send to Facebook.
b. Select either the Send as email or Email photo function in the menu on your cellphone.
c. When a new message appears (with the selected photo attached), key in mobile@facebook.com in the ‘To:’ Textbox.
d. Key in the title of your photo in the subject column.
e. Choose ‘Send’.
f. Once your cellphone receives an email of notification from Facebook, you will receive a code or password.
g. Check that you are logged onto your Facebook account and go to facebook.
h. Click on the Activate Facebook Mobile button.
i. Click on ‘Sign Up Here’ and ‘Confirm your phone’ at the bottom of the page.
j. Look for the Beneath the ‘Already have a confirmation code’ and click.
k. Key in your password when prompted with ‘Input the code you received in your email’ and ‘Confirm’.

Setting Yahoo Availability Through Yahoo Mail

Finding Your Yahoo Availability Settings Through Yahoo Mail

Ever leave your Yahoo! Mail signed in to receive an IM at the worst possible moment? Take advantage of your Yahoo! availability settings through Yahoo! Mail and let your contacts know when you are open to talk.

To access the Yahoo! Mail availability settings, find the status menu located to the right of your name adjacent to the Yahoo! Mail logo in the top, left-hand corner.

Available Setting Through Yahoo! Mail

Choose “Available” from the Yahoo! mail availability settings to let your contacts know you are available to receive IMs through Yahoo! Mail.

Busy Setting Through Yahoo! Mail

Choose “Busy” from the Yahoo! Mail availability settings when you are working on the computer, on the phone, in a meeting or otherwise cannot be interrupted.

Invisible Settings Through Yahoo! Mail

Choose “Invisible” when you want to appear offline on Yahoo! Mail. This option allows you to continue IM in Yahoo! Mail with your choice of online users without appearing available to others.

[Note: Members to whom you appear offline to can still send you IMs, which would regularly be saved in your offline messages. They will receive a message that you are offline and will receive their IM when you sign back in, despite having already received the message.

Signing Out of IM Through Yahoo! Mail

Limit interruptions while in Yahoo! Mail by selecting “Sign Out of Chat,” which effectively ends your Yahoo! Mail IM sessions and allows you to check your Yahoo! Mail inbox without receiving IMs.

Personalized Availability Messages Through Yahoo! Mail

Screenshot of www.mail.yahoo.com reproduced with permission of Yahoo! Inc. ©2009 Yahoo! Inc. Yahoo! Mail users can also create a personalized availability message by selecting "Custom Status Message…" from the Yahoo! Mail availability settings.

Complete Creation of Your Yahoo! Mail Availability Message

A custom availability setting window will appear in Yahoo! Mail, allowing you to select the level or your availability in addition to adding a personalized availability message for Yahoo! Mail and Yahoo! Messenger users to see.

Once complete, select “Ok” and your message will automatically appear on Yahoo! Mail. The message will also be saved for use in the future.

Setting Availability on Yahoo! Messenger

How to Limit Distractions with Your Availability


Ever leave your Yahoo! Messenger account signed in to find you receive an IM at the worst possible moment? Taking advantage of Yahoo! Messenger’s availability status feature lets your contacts know when you are open for an interruption on the computer or when you can’t be reached.

You can even use Yahoo! Messenger’s availability status to set your account to invisible, making it appear you have signed off when you want to continue a conversation with a contact without someone else know you are online.

To access the Yahoo! Messenger availability status panel, first click “Messenger” on the top Yahoo! toolbar, then select “My Availability.”

Choosing Available

Choose “Available” from the adjacent availability settings menu to let your contacts know you are available to receive IMs and audio/video chat requests on Yahoo! Messenger. You can also select this option by pressing Ctrl+Alt+A.

Setting Busy Message

Choose “Busy” from the adjacent availability settings menu when you are working on the computer, on the phone, in a meeting or otherwise cannot be interrupted. Users can also activate the “busy” status by pressing Ctrl+Alt+B.

Going Invisible on Yahoo! Messenger

Choose “Invisible” when you want to appear to be offline on Yahoo! Messenger. This option allows you to continue IM and audio/video chats with the users you wish to converse without appearing available to others. [Note: Members to whom you appear offline to can still send you IMs, which would regularly be saved in your offline messages. They will receive a message that you are offline and will receive their IM when you sign back in, despite having already received the message.

Creating Yahoo Groups for Your Contacts

How to Add Groups to Your Yahoo! Contacts

Whether you are looking to add a Yahoo group for a new niche of friends or you desire to make your Yahoo! Messenger experience more efficient, adding Yahoo groups to your contact list is the fastest way to organize your IM client.

To begin, use your cursor and click “Contacts” on the top toolbar on the Yahoo! Messenger client window, then select “Manage Groups,” then select “Create a Group.”

Add Your Yahoo! Group Name

A "Create New Group" window will appear, prompting you to enter the new Yahoo group name. Enter your Yahoo group name exactly as you would like it to appear on your Yahoo! Messenger contact list, then click “Ok.”

Your New Yahoo! Group Has Been Added

Your new Yahoo group will appear on your Yahoo! Messenger contacts list, ready for you to add contacts new and old to the Yahoo group.

Add Contacts to Your Yahoo! Group

Reproduced with permission of Yahoo! Inc. ©2008 Yahoo! Inc.

To add a contact to your new Yahoo group, select “Contacts” again, then “Manage Groups,” then “Move to Group…” from the top toolbar on the Yahoo! Messenger client window.

Select Contacts for Your Yahoo! Group

A window will appear prompting users to select the Yahoo! Messenger contacts you would like to move to your Yahoo group. To select multiple users, click Ctrl as you click each contact’s radio button, to the left of their screenname.

Click “Ok” to continue.

Select Your Yahoo! Group

Reproduced with permission of Yahoo! Inc. ©2008 Yahoo! Inc.

Next, click the name of the Yahoo group you would like to move these contacts to and press “Ok” to continue. Users can also click “Create a New Group” to create a new Yahoo group label at this time.

Your Contacts Have Been Added to Your Group

Your contacts are now successfully moved to your new Yahoo group. Next time they log on (dependent on if they have accepted your request to add them to your Yahoo! Messenger contact list), they will appear under this new Yahoo group label.


Adding Contacts on Yahoo! Messenger

How to Add New Friends, Family to Yahoo! Messenger

One of the most common functions Yahoo! Messenger users should know is how to add contacts to their Yahoo! Messenger contacts list. Adding contacts is a breeze and soon, you will be able to see who is online and ready to chat with a quick glance at your contacts list.

To begin, use your cursor and click “Contacts” on the top toolbar on the Yahoo! Messenger client window, then select “Add a Contact.” You can also press the following hotkeys in the future: Ctrl+Shift+A.

Enter Your Contact's Yahoo! Messenger ID

A window will appear prompting you to enter your contact’s Yahoo! Messenger ID or Windows Live Messenger screenname. For Windows Live Messenger users, ensure you have selected the Windows Live Messenger network underneath the “Network” drop-down menu, then click “Next.”

You can also click “Choose a Contact from Your Address Book” to select contacts from your Yahoo! email. (Note: If the contact is not part of Yahoo! Messenger, they will receive an invitation to join from your screenname).

Select the Yahoo! Group for Your Contact

Next, select the group you would like to add this contact to. At this time, you can also add a personalized message to be sent to the contact letting them know who you are and why you want to add them to your Yahoo! Messenger contact list.

Once you have finished, click “Next.”

Adding Yahoo! Contact Complete

A confirmation message will appear letting you know you have successfully added the contact to your Yahoo! Messenger contact list on your end. This contact will not appear active, however, until they decide to accept your request.

Click “Finish” to exit the window.

Sending IMs in Yahoo! Messenger

The Simple Guide to IM on Yahoo!


After you Download and Install Yahoo! Mesengger, one of the first lessons in using your new IM client is learning how to send an instant message in Yahoo!

To begin, locate a contact on your Yahoo! Messenger contact list and double-click on their Yahoo! or Windows Live MessenggeID (or screenname.)

Sending Your IM

Instantly, a Yahoo! IM window addressed specifically to that contact will appear in Yahoo! Messenger. You can then type a message in the text field at the bottom of the window and press Enter to send the message to your Yahoo! Messenger contact.

Alternative Instructions for Sending Yahoo! IM

Alternately, Yahoo! Messenger users can also send an IM by selecting “Actions” on the top Yahoo! toolbar, then selecting “Send an Instant Message.” Users can also use the following hotkeys to send an IM in Yahoo! Messenger: Ctrl+IM.

Select IM Recipient

A menu of contacts signed in to Yahoo! Messenger will appear. Click the screenname or ID of the Yahoo!/Windows live messenger contact you would like to send an IM to, then press “Okay.” An IM window addressed specifically to that Yahoo! user will appear in Yahoo! Messenger.


How to Sign-In to Yahoo! Messenger

Sign in with Your Yahoo! ID and Password


After you Download and Install Windows live messenger, you are ready to sign in to Yahoo.

First, locate the Yahoo! Messenger icon on your desktop or in your applications on your PC. Once the client has launched, you can enter your screenname in the first field labeled “Yahoo! ID”, then your password in the second field labeled “Password.” Press “Sign-In” to continue.

No Yahoo! ID? No Problem! If you are a new user, you can sign-up for a free Yahoo! Messenger ID by clicking the link labeled “Get a New Yahoo! ID…” This will allow you to register a new screenname immediately.

Signing In to Yahoo! Messenger

Reproduced with permission of Yahoo! Inc. ©2008 Yahoo! Inc.

After clicking “Sign-In,” Yahoo! Messenger’s smiley logo will become animated. Within moments, you should be signed in to Yahoo! Messenger’s IM network, giving you access to contacts across both Yahoo! and Windows Live Messenger.

Contact List Appears on Yahoo! Messenger

Once signed-in to Yahoo! Messenger, your Yahoo! Messenger contact list will appear, allowing you to begin sending IMs and audio/video messages.

Web proxy sites, http proxies, access blocked web sites, internet unblocker

Web Proxies & proxy sites allow you to surf the web with a greater level of anonymity, privacy and security. Information that might be used to identify you such as IP address, country of origin, browser type and operating system is removed by the web proxy server. The web site you are accessing observes the communication originating from the proxy server, not your computer. Another name is anonymous proxy, anonymizer or anonymizing proxy because it facilitates Internet browsing without revealing your identity, and Circumventer because it allows you to circumvent a college internet filter or company firewall.

Companies and schools like to prevent access to many websites but a proxy site will help you avoid being blocked by web filters. Education and corporate networks such as offices, college, school networks or public libraries & even Internet cafes - anywhere that might have filtered Internet connection. A proxy site gives you unblocked access to any website, allows you to bypass an Internet filter, firewall and bypass web site blocking policies.

No software installation is needed to browse blocked websitbes through this web proxy, just enter the web address of the site you want to visit. Unblock Youtube, Myspace, Facebook, eBay, BlackPlanet, Bebo, Hi5, Fotolog, Amazon, Orkut, Yahoo, BBC, MTV, Blogger, Skyblog, Pandora, Flickr, Xanga, Netlog, Wikipedia, live365, Ifilm, Tagged, CNN, Craigslist, Technorati, GameSpot, IMDB, StupidVideos, FileCabi, Photobucket, ImageShack, 1.fm, Metacafe. You can access any website that might be filtered by your company or university firewall such as social networking, news, video sharing, music, games, shopping, chat & arcade websites can all be unblocked and accessed. Proxies allow you to surf any website you like!

You can surf the web whenever you want with this fast and reliable proxy, which runs on a dedicated web server with maximum availability. Our web server is situated in the United States and has a privacy policy. This proxy site is very safe and secure to use. We have no annoying popup adverts.

Access any website & surf the Internet privately, securely and anonymously. This proxy site lets you access any website from any location. Unblock Facebook Myspace proxy.